Cueclip

Great starts at 0:00

Features
Pricing
Download

Get started

  • What is CueClip?
  • Record your screen, camera and mic
  • Import a video you already recorded
  • Combine a screen recording and a camera recording

Auto-edit

  • Auto Edit: clean a video in one pass
  • Remove filler words (um, uh, like)
  • Shorten gaps and dead air
  • Remove retakes automatically
  • Retake cue words: mark bad takes out loud

Edit by hand

  • Edit your video by editing the transcript
  • Right-click to mute, speed up, split or delete
  • Fix names and terms with the Transcript Dictionary

Captions, zoom & sound

  • Add captions
  • Auto-zoom and manual zooms
  • Remove background noise and enhance your voice
  • Turn a long video into Shorts, Reels and TikToks

Export & share

  • Export your video
  • Export XML to Final Cut, Premiere or DaVinci Resolve
  • Export caption files (.srt and .vtt)
  • Share a video with a link

Account & AI

  • AI credits and bringing your own key

Help Center / Get started

Record your screen, camera and mic

How to record a display, a single window or a custom area on Mac, with your camera, microphone and system audio, and open it straight in the editor.

Updated 2026-10-10

Turn Any Screen Recording Into an Apple-Style Reel

Start a recording

  1. Choose File → Start New Recording (⌘⇧R), or click New Recording on the home screen.
  2. Under Screen Recording, pick what to capture: Display, Window or Area.
  3. Turn on your Camera and pick a Microphone if you want them. Watch the level meter next to Microphone to confirm it is live.
  4. Click the blue button (for example Choose Window) to start. When you stop, the recording opens in the editor automatically.
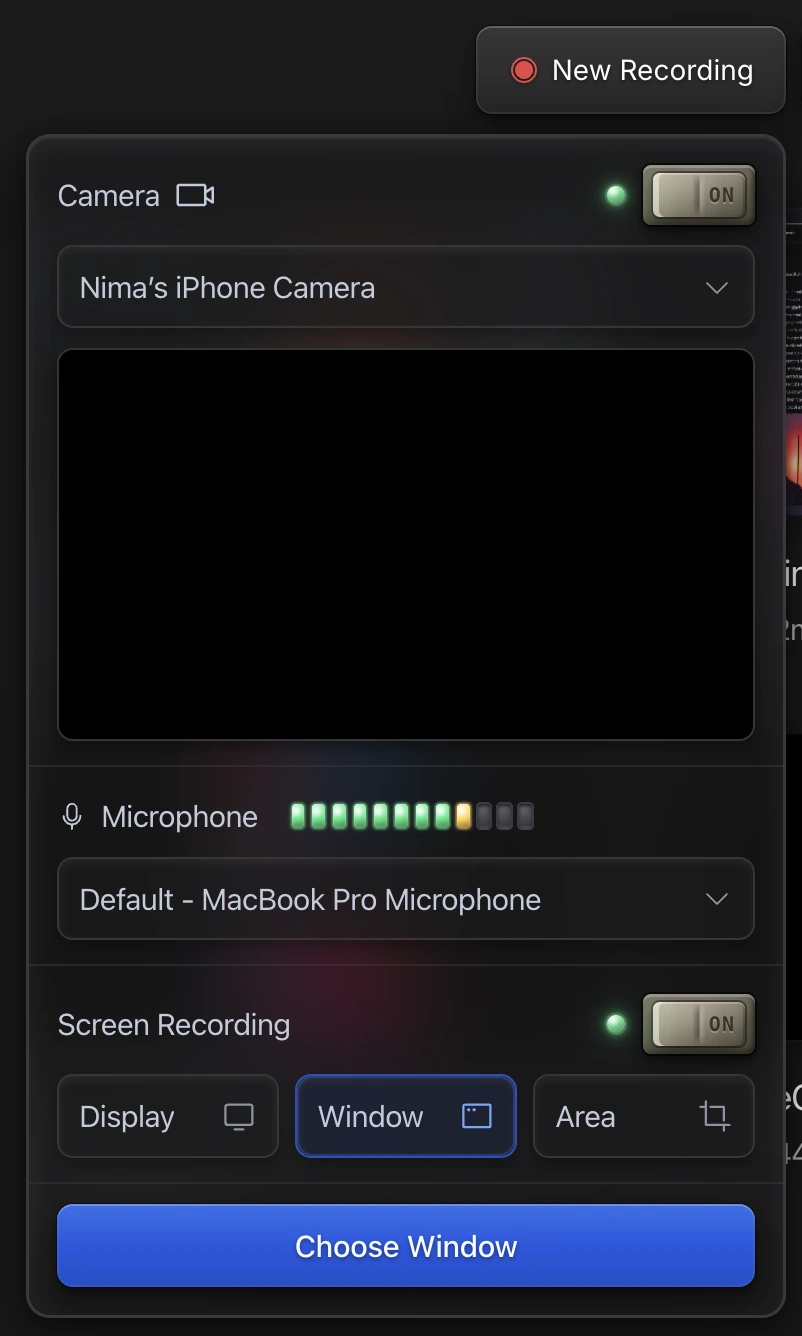
The recording setup panel showing Screen Recording, Camera and Microphone sections

Display, Window or Area

OptionBest for
DisplayRecording everything on one monitor.
WindowRecording one app. Clutter from other windows stays out.
AreaRecording a custom rectangle, such as a fixed 1920×1080 frame.

Permissions

macOS asks for Screen Recording, Camera and Microphone permission the first time. After you grant Screen Recording, macOS may ask you to restart CueClip before it takes effect. That is a macOS rule, not a CueClip bug.

Next steps

If you recorded a screen and a camera, you can change how they are arranged, and you can reframe a landscape recording to vertical for Reels and Shorts. See the vertical video guide.

Questions

Can CueClip record a single window on Mac?

Yes. Choose Window under Screen Recording and pick the app window. You can also record a whole display or a custom area.

Does it record system audio?

Yes. CueClip can capture microphone and system audio together with the screen and camera.

I granted Screen Recording permission but it still does not record.

Quit and reopen CueClip. macOS only applies a new Screen Recording permission after the app restarts.

Related

Import a video you already recordedAuto-zoom and manual zoomsTurn a long video into Shorts, Reels and TikToks

Still stuck? Email support@cueclip.app.

← What is CueClip?Import a video you already recorded →
0:00
0:10
0:20
0:30
0:40
0:50
1:00
Cueclip

Clean Recordings in Minutes

Support

ContactHelp CenterTerms of ServicePrivacy PolicyAffiliatesPricing
BlogCueClip vs DescriptBest Auto-Edit Tools 2026CueClip vs Screen StudioCueClip vs CapCutCueClip vs LoomCueClip vs Opus ClipCueClip vs SubmagicCueClip vs RiversideCueClip vs Premiere ProCueClip vs Final Cut Pro

How To

How to Edit Course Lectures FastFor Maven InstructorsFor Skool CreatorsFor Udemy InstructorsFor Skillshare Instructors

© 2026 CueClip (by Mokline)

TinyLaunch Badge
Featured on DailyPings

P.S. It's CueClip, not Qclip — but we'll let it slide.

CUECLIP